A summer full of code


Four months of constant coding and excitement comes to an end – I still can’t believe I am saying this. While I am really really happy with how these times went – how fast, how satisfying, how perfectly awesome it went. It is just still hard to believe that it has ended – time flies, literally!

Here goes my wrap-up blogpost for all these months of tireless programming. Here’s to a summer full of code! 🙂

Background

As I have mentioned in my last few blog posts on several updates, I have been working on the Language Coverage Matrix Dashboard project for the Language Engineering Team of Wikimedia Foundation as my Google Summer of Code project. This web-based application automates all the information that are available on the Language related topics that Wikipedia and its Sister project covers – tools they support, languages they have support for, statistics that are available for public use etc. The target users are obviously the researchers, linguists, i18 developers, and even MediaWiki developers concerned about the Language technology, willing to implement somewhere else, you know, for good!

That said, I am going to post here a detailed description of the final product that we have achieved so far.

Demo Instance: http://tools.wmflabs.org/lcm-dashboard/lcmd/

The User Interface

We have actually done a lot of thinking around the user interface throughout the period of GSoC. The final one turned out be quite satisfying. The whole page is now divided into two major parts – a) where all the queries that are available would be displayed. b) the results to show. So, now it has become same for the Language based queries, as well as the tools based ones. Filter is there for the tools based queries.

The diagram of the UI is uploaded on commons. Check it out!

Relevant Code: On GitHub!

LCMD – Landing Page

Basic Functionalities

Now that you’ve seen the UI that we have aimed to achieve. Let’s go deeper into the functionalities.

  • Search

    The whole searching concept has been divided into two parts, two ways, to be specific.

    • Language Based Search: Like you can see from the design and the interface that has been implemented, a search bar for the Language search is there. Essentially you get to search for all the Languages that are on the database of ours, i.e. the ones that are supported by Wikimedia Projects. jQuery.ime – a development work by the Language Engineering developers has been implemented on the search. Language search have features like : Suggestions, Auto-Completion etc, to provide users with more efficient search. Output of the search for a particular language would obviously give all the relevant details that we have for that particular language.

Language Search with autocomplete facility

Language Search with autocomplete facility

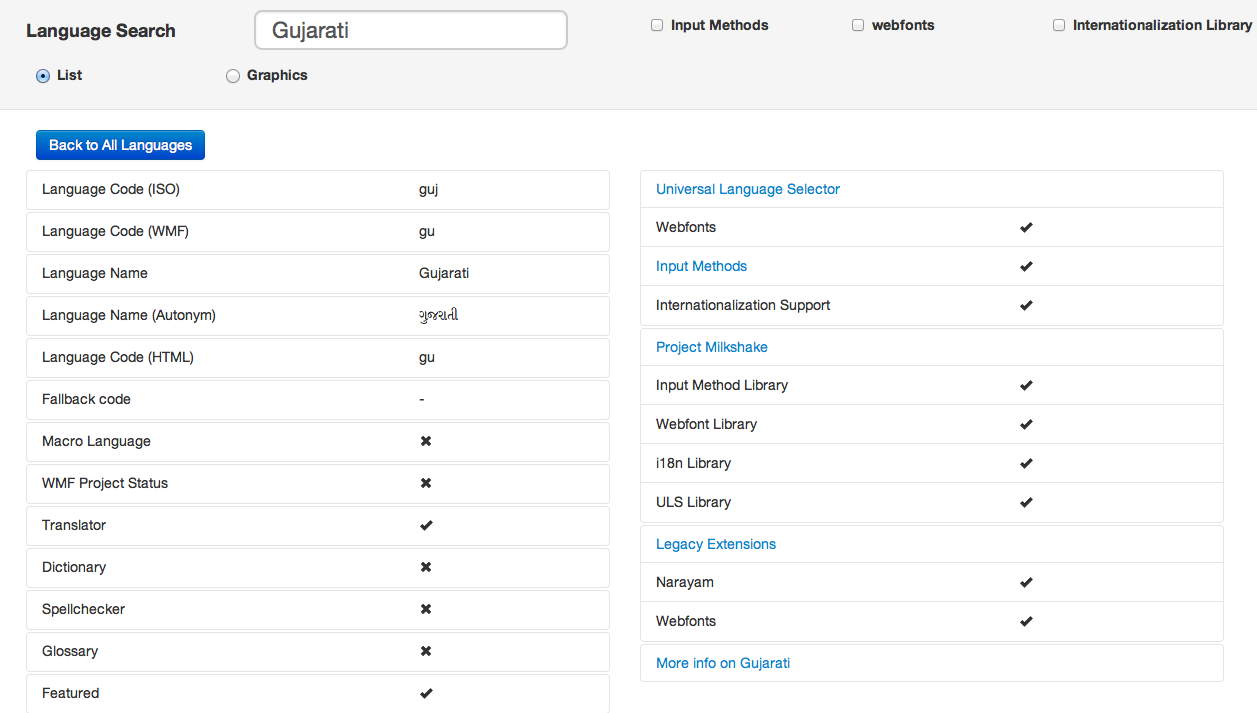
Language Search Result

  • Tools Based Search: This is important. This basically a feature to play around all the language data we have. I have got a filter for that – a JS application that filters out all the language data with respect to tools based queries. So, essentially this outputs the languages that support particular tools. Tools based queries work around three basic queries –
    • Input Method
    • Webfonts
    • Internationalization Library
  • Filter: 

    As mentioned above the tools based query part does have this feature where you can filter out all the language data with respect to the tools based query. A JavaScript code runs behind to have this running. Outputs the language names that support the particular tools that may be selected on the radio button

  • API Console

    This is probably my favourite feature from LCMD.  If a third party user wants to fetch these language related data then they can easily get data by calling these APIs. For better understanding of API I have developed API console.
    This is similar to MediaWiki API sandbox. In which you just have to select from dropdown and then press on request button and then “BINGO”. Yes you will find

Language API Console

That is almost what it is. Now a quick overview on how I have developed stuff over time, things I have just described above, and the processes behind. This would also include a few stuff that we changed afterwards. Some of the updates you might have followed on my previous blogposts, this one would work as a summary of those.

June – Community Bonding Period:

  • In the community bonding period I first thought/planned about new technologies which I would be using in my project.
  • Started with the database – created the database schema.
  • All the data was in a spreadsheet –  created one python script so that it could transfer all the data from spreadsheet to database automatically.
  • The week after, I started working on new language entry system, database connection and completed it.
  • Implemented language search system with suggestion for the language names.
  • Implemented the feature to get the language details.

July – Coding out the Functionalities, start!

  • Created and set up primary thing on Wikimedia Labs.
  • Done minor changes in Language Search System.
  • Created on the spot editing facility for any language detail under admin privileges
  • Created Filter Facility
  • Database schema changed
  • jquery based new alternative REST architecture created
  • Language to Font mapping
  • Language to Input method mapping
  • Redefining search implementation

August – Coding, coding, coding!

  • Created login system for admin + session management
  • Designed new UI on langfilter.php page
  • Developed PI visualization chart
  • Developed API for language detail
  • Developed example for API usage
  • Created preview system for new language entry system as well as direct editing feature

September – the last touch.

  • Developed API console for 3rd party user to use these data for their website.
  • Redesigned entire NEW UI as per proposed scheme
  • Small correction in functionality
  • Solved a few bugs

Documentations:

All the things that I have documented so far in these four months, here goes!

A note to thank you all, who were there

I loved living this four months of my life. But, Google Summer of Code is not why I love Wikimedia Foundation. Rather, it is just another event that happened between the Foundation and myself. I have been an active volunteer to Wikimedia projects for a long time now. And, yes, I have been thankful for each and every day I have spent with MediaWiki, Wikipedia and the people around all those projects. GSoC has been a different kind of excitement – recognition feels good. Honestly, it does. But what feels even better than that is to get a merged status on some hundred lines of code that I have written. GSoC has given me many merges – I am thankful for each of them. Runa and Alolita have been amazing mentors to me. For all the things I have done good, for all the pushes I needed to do them that way – they have been there always. Special thanks to Quim, Sumana and Sucheta to help me throughout. I am sure, I am motivated enough to live for another four decades just to code. JUST for the sake of coding. Yes. GSoC definitely played a great part on achieving that motivation.


Here’s to Google Summer of Code!  🙂 🙂

How to implement system command using python


In this post I will show you that how you can exactly implemented system command using python.Here we use for example ls -l command. When I use this command in terminal it gives me following output

Harshs-MacBook-Pro:scripts harshkothari$ ls -l
total 32
-rw-r--r--  1 harshkothari  staff    13 Jul 23 02:33 demo.ini
-rw-r--r--@ 1 harshkothari  staff  1864 Jul 23 04:30 filesread.py
-rw-r--r--  1 harshkothari  staff  4121 Jul 23 04:30 langtofontmap.json

Now this command we can implement by following methods using python 🙂

  • os.system("command with args") passes the command and arguments to your system’s shell. This is nice because you can actually run multiple commands at once in this manner and set up pipes and input/output redirection.
    os.system("command < input_file | anothercommand > output_file")
    However, while this is convenient, you have to manually handle the escaping of shell characters such as spaces, etc. On the other hand, this also lets you run commands which are simply shell commands and not actually external programs. http://docs.python.org/lib/os-process.html

    >>> import os
    >>> os.system('ls -l')
    total 32
    -rw-r--r--  1 harshkothari  staff    13 Jul 23 02:33 demo.ini
    -rw-r--r--@ 1 harshkothari  staff  1864 Jul 23 04:30 filesread.py
    -rw-r--r--  1 harshkothari  staff  4121 Jul 23 04:30 langtofontmap.json
    0
  • stream = os.popen("command with args") will do the same thing as os.systemexcept that it gives you a file-like object that you can use to access standard input/output for that process. There are 3 other variants of popen that all handle the i/o slightly differently. If you pass everything as a string, then your command is passed to the shell; if you pass them as a list then you don’t need to worry about escaping anything. http://docs.python.org/lib/os-newstreams.html
    >>> import os
    >>> print os.popen('ls -l').read()
    total 32
    -rw-r--r--  1 harshkothari  staff    13 Jul 23 02:33 demo.ini
    -rw-r--r--@ 1 harshkothari  staff  1864 Jul 23 04:30 filesread.py
    -rw-r--r--  1 harshkothari  staff  4121 Jul 23 04:30 langtofontmap.json
  • The Popen class of the subprocess module. This is intended as a replacement for os.popenbut has the downside of being slightly more complicated by virtue of being so comprehensive. For example, you’d say
    print Popen("ls -l", stdout=PIPE, shell=True).stdout.read()
    instead of
    print os.popen("ls -l").read()
    but it is nice to have all of the options there in one unified class instead of 4 different popen functions. http://docs.python.org/lib/node528.html

    >>> from subprocess import Popen, PIPE
    >>> print Popen("ls -l", stdout=PIPE, shell=True).stdout.read()
    total 32
    -rw-r--r--  1 harshkothari  staff    13 Jul 23 02:33 demo.ini
    -rw-r--r--@ 1 harshkothari  staff  1864 Jul 23 04:30 filesread.py
    -rw-r--r--  1 harshkothari  staff  4121 Jul 23 04:30 langtofontmap.json
    
  • The call function from the subprocess module. This is basically just like the Popen class and takes all of the same arguments, but it simply wait until the command completes and gives you the return code. For example:
    call(["ls", "-l"], shell=True) http://docs.python.org/lib/node529.html

    >>> from subprocess import call
    >>> call(["ls", "-l"], shell=True)
    demo.ini                filesread.py            langtofontmap.json
    0
  • Using command module http://docs.python.org/2/library/commands.html
    >>> import commands
    >>> commands.getstatusoutput('ls -l')
    (0, 'total 32\n-rw-r--r--  1 harshkothari  staff    13 Jul 23 02:33 demo.ini\n-rw-r--r--@ 1 harshkothari  staff  1864 Jul 23 04:30 filesread.py\n-rw-r--r--  1 harshkothari  staff  4121 Jul 23 04:30 langtofontmap.json')
    >>> commands.getoutput('ls -l')
    'total 32\n-rw-r--r--  1 harshkothari  staff    13 Jul 23 02:33 demo.ini\n-rw-r--r--@ 1 harshkothari  staff  1864 Jul 23 04:30 filesread.py\n-rw-r--r--  1 harshkothari  staff  4121 Jul 23 04:30 langtofontmap.json'
    
  • The os module also has all of the fork/exec/spawn functions that you’d have in a C program

Hope this will help you 🙂

OpenCV on your MAC – Easy to install and Configure


OpenCV

OpenCV

OpenCV (Open Source Computer Vision Library) is a library of programming functions mainly aimed at real-time computer vision, developed by Intel, and now supported by Willow Garage and Itseez. It is free for use under the open source BSD license. The library is cross-platform. It focuses mainly on real-time image processing. If the library finds Intel’s Integrated Performance Primitives on the system, it will use these proprietary optimized routines to accelerate itself.

Here in this BlogPost I will explain you to install OpenCV(version 2.3, 2.4) on your MAC 🙂

There are two way to build openCV on your MAC.

1. You can use MacPorts

For this first you have to install MacPorts. The easiest way to install MacPorts on a Mac OS X system is by downloading the dmg for Mountain LionLionSnow Leopard orLeopard and running the system’s Installer by double-clicking on the pkg contained therein, following the on-screen instructions until completion. Installation package is here.

After installing MacPort you have to update it to latest version.

$ sudo port selfupdate

Now you can install OpenCV by running following command

$ sudo port install opencv

If you want to install python building

$ sudo port install opencv +python27

or with python 2.6

$ sudo port install opencv +python26

or with QT

$ sudo port install opencv +qt4

So by this way you can install OpenCV in your MAC OS.

2. You can use CMake

By using CMAKE you can also install OpenCV on  your mac. For that first you should have to install CMake, which thankfully comes with Mac binaries – so that was easy. You can download .dmg file here.

After installing CMake you have to download the OpenSource Package that you can download by clicking here.  Now you have OpenCV-2.4.3 ter.bz2 and unzip to folder. Now open terminal and go to that folder and write following commands in Terminal.

$ mkdir build

$ cd build

$ cmake -G "Unix Makefiles" ..

$ make -j8

$ sudo make install

Now You have done. Congrats you have installed OpenCV on your MAC 🙂

Now you can check by doing following thing.

GO to TerminalType Python

Now type

>>> import cv

Now if it run without any error then \m/ but if you encountered with following error

>>> import cv
Traceback (most recent call last):
 File "<stdin>", line 1, in <module>
ImportError: No module named cv

Then close python by pressing ctrl + D key and now you have to run following command

 $ export PYTHONPATH=/usr/local/lib/python2.7/site-packages/

after running this command restart the Terminal and then open python and import cv this will work 🙂

If you have any doubt or problem then you can comment here. Thanks.

CoffeeScript – The Awesome way to write JavaScript


Do you struggle with Braces and semicolon in writing code of JavaScript. There is a solution of this problem and that is – CoffeeScript.  In this post I’ll explore  CoffeeScript – a minimalistic language that compiles to JavaScript.

CoffeeScript – The Awesome way to write JavaScript

CoffeeScript

CoffeeScript

CoffeeScript is a little language that compiles into JavaScript. Underneath all those awkward braces and semicolons, JavaScript has always had a gorgeous object model at its heart. CoffeeScript is an attempt to expose the good parts of JavaScript in a simple way.

The golden rule of CoffeeScript is: It’s just JavaScript. The code compiles one-to-one into the equivalent JS, and there is no interpretation at runtime. You can use any existing JavaScript library seamlessly from CoffeeScript (and vice-versa). The compiled output is readable and pretty-printed, passes through JavaScript Lint without warnings, will work in every JavaScript runtime, and tends to run as fast or faster than the equivalent handwritten JavaScript.

The language adds syntactic sugar inspired by Ruby,Python and Haskell. NO braces and semicolons. Since March 16, 2011, CoffeeScript has been on GitHub‘s list of most-watched projects, and as of 29 August 2012 is the eleventh most popular language on GitHub. CoffeeScript compiles predictably to JavaScript and programs can be written with less code, typically 1/3 fewer lines, with no effect on runtime performance

Syntax of CoffeeScript – Easy to use – Easy to Read

Here I am showing some example.

1. Assignment

str = "CoffeeScript"

2. Function

square = (x) -> x * x

3. Condition

string = "Passed" if  condition

4. Multiply numbers with 2

[1..10].map (i) -> i*2 

5. Object

math =
  root:   Math.sqrt
  square: square
  cube:   (x) -> x * square x

6. Loop

eat food for food in ['toast', 'cheese', 'wine']

CoffeScript vs JavaScript Code

CoffeScript vs JavaScript

Installation

The CoffeeScript compiler is itself written in CoffeeScript, using the Jison parser generator. The command-line version of coffee is available as a Node.js utility. The core compiler however, does not depend on Node, and can be run in any JavaScript environment, or in the browser.

To install, first make sure you have a working copy of the latest stable version of Node.js, and npm(the Node Package Manager). You can then install CoffeeScript with npm:

npm install -g coffee-script

(Leave off the -g if you don’t wish to install globally.)

If you’d prefer to install the latest master version of CoffeeScript, you can clone the CoffeeScriptsource repository from GitHub, or download the source directly. To install the lastest master CoffeeScript compiler with npm:

npm install -g http://github.com/jashkenas/coffee-script/tarball/master

Or, if you want to install to /usr/local, and don’t want to use npm to manage it, open the coffee-script directory and run:

sudo bin/cake install

For More Information and learning
1.http://coffeescript.org
2.http://jashkenas.github.com/coffee-script/documentation/docs/grammar.html

What makes C++ so good?


Answer by Harsh Kothari:

1: Stronger Type Checking – the use of classes, inheritance &amp; automatic type conversions mostly eliminates the need for the abominable void* of C.

2: Type safe linkage – you can’t accidentally call a routine from another
module with the wrong type and/or number of arguments – even if your header files get out of date.

3: A complex data type is provided. It includes all the standard arithmetic operations, implemented as operators, not function calls.

4: User-defined operators and function overloading are supported. When you design a data type you can specify which operators &amp; functions are provided.

5: You can use class libraries to provide robust new data types which can be made exceptionally easy to use.

For example, the Rogue Wave ‘math.h++’ class library implements general multi-dimensional arrays which can be manipulated with high-level operations
and an intuitive syntax:

DComplexArray a(10,10); // Construct a 10×10 complex array
cin >> a; // read it in from standard input
DComplexArray b = inverse(a); // Calculate the inverse
cout << b; // write out the inverse
cout << variance(b.diagonal()); // write out the variance of the diagonal
elements of b

6: You can define automatic type conversions to convert between data types.
For example, the Rogue Wave library provides a conversion from a double array
to a complex array.

DoubleVec a(10, 0.0, 1.0); // Construct a double vector in initialised to
{0,1,2,3,4…
DComplexVec z = a; // Construct a complex vector initialised to
{(0,0),(1,0),(2,0),…
cout << a; // write them out
cout << z;
cout << cos(z)*exp(DComplex(0,1)*a);

7: Provides inline functions which combine the efficiency of using macros
with the safety of using functions – simply prepend the word ‘inline’ in
front of the function – if the compiler can inline it, it will.

inline Double
SumOfPositiveElements
(const DoubleVec&amp; v)
{
Double theSum = 0;
for (int i = 0; i < v.length(); i++) {
if (v[i] > 0) {
theSum += v[i];
}
}
return theSum;
}

8: C++ Compiles most ANSI C code directly and can call compiled C code
directly, so you don’t even have to learn anything new at all!

9: You don’t have to put all of your declarations at the top of each block
in C++.
This means
that you can organise your code into logically related ‘paragraphs’ complete
with their necessary declarations. This makes code much more maintainable –
you can easily move sections of code around, taking the necessary
declarations along at the same time. If you use the const modifier you can
also ensure that variables whose value should not change after it is first
calculated do not do so.

Double x,y; // Declare two variables
cin >> x >> y; // read in their values
const Double sqrtX = sqrt(x); // Calculate the square roots
const Double sqrtY = sqrt(y);
cout << sqrt(sqrtX+sqrtY);
sqrtX = 42; // Will give an error…

10: Classes provide extensible types, promoting code reuse. This can
result in major savings in the amount of code written. I saw a recent
article which stated that the new Taligent operating system, which is written
in C++, consists of 250,000 lines of code, whereas WindowsNT, written in C,
was said to consist of 4,000,000 lines of code.

View Answer on Quora